

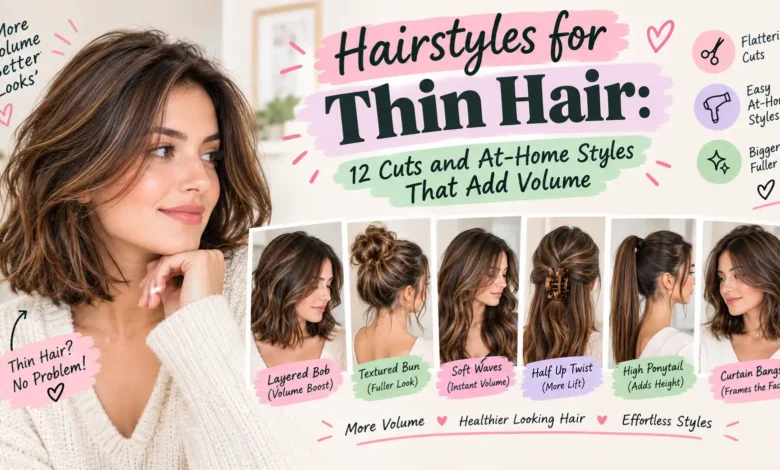
The best hairstyles for thin hair keep the ends blunt, put lift at the roots, and add soft texture so each strand takes up more room. For a cut, a blunt bob, a collarbone lob or long hair with face-framing layers usually looks fullest. At home, a zigzag part, a root-lift blowout or a pancaked braid can make the same hair look thicker in minutes.
This guide splits hairstyles for thin hair into two parts: six haircuts to ask your stylist for, and six styles you can do yourself, each with numbered steps. It also covers thinning on top, the best choices for each length, common mistakes, and when thin hair is worth a dermatologist visit. For everyday styles on any hair type, see our guide to easy hairstyles to do yourself.
- Cut: blunt ends and fewer layers make the edge look denser.
- Length: shoulder length or shorter weighs less, so the roots lift more easily.
- Style: lift at the roots, texture through the lengths, and no heavy product up top.
- Watch for: a sudden change in how much hair you have is a reason to see a dermatologist, not a stylist.
Best hairstyles for thin hair at a glance
| Style | Cut or style | Best length | Why it looks fuller |
|---|---|---|---|
| Blunt bob | Cut | Chin to jaw | One solid line at the ends |
| Collarbone lob with invisible layers | Cut | Collarbone | Lift on top, blunt edge below |
| Long hair with face-framing layers | Cut | Past the shoulders | Shape at the front, weight kept at the ends |
| Soft shag | Cut | Chin to shoulder | Movement at the crown |
| Curtain bangs | Cut | Any | Softens the hairline and temples |
| Textured pixie | Cut | Short | Short layers stand up on their own |
| Dimensional color | Color (salon) | Any | Less contrast between hair and scalp |
| Zigzag part | Style | Any | Hides a straight line of scalp |
| Root-lift blowout | Style | Chin length and longer | Roots set upright as they cool |
| Pancaked braid | Style | Shoulder length and longer | Loops pulled wide cover more space |
| Propped ponytail | Style | Shoulder length and longer | Pins lift the base off your head |
| Overnight braid waves | Style | Shoulder length and longer | Bends make strands take up more room |
| Donut bun | Style | Shoulder length and longer | A filler gives the bun its size |
Thin, fine or thinning? Why it changes your choices
These words get mixed up, but they mean different things. Fine hair describes each strand: it’s narrow. Thin hair describes how many strands you have: there are fewer of them, so the scalp shows more easily. You can have both at once, or thick, coarse strands that are still thin in number.
Thinning means a change over time. The American Academy of Dermatology (AAD) lists the signs of hair loss, which include a “Widening part” and a “Thinner ponytail.” If your hair has always been thin, the styles below are all you need. If it’s getting thinner, they still help, but read the section below on when thin hair is more than a styling problem too.
Six haircuts that make thin hair look fuller
When it comes to hairstyles for thin hair, women usually ask about the cut first, because the cut does most of the work. The common thread is weight at the ends. Every layer your stylist cuts removes weight from the edge, and thin hair doesn’t have much bulk to spare there.
Blunt bob
Ask for: a chin-to-jaw-length bob cut to one length, with a blunt, straight perimeter and no stacked layers at the back.
Why it looks fuller: all the ends stop at the same line, so the edge looks dense and solid. Short hair is also lighter, so the roots aren’t pulled flat.
Works best on: straight to slightly wavy hair.
Skip it if: you tie your hair back most days. A chin-length bob won’t reach a full ponytail.
Collarbone lob with invisible layers
Ask for: a lob that grazes the collarbone, with a blunt perimeter and “invisible” or internal layers cut underneath the top section.
Why it looks fuller: the hidden layers let the top lift without thinning the edge. It also still reaches a ponytail, which a shorter bob won’t.
Works best on: straight, wavy or loosely curly hair.
Skip it if: your hair rests on your shoulders and flips out in a way you don’t like. Go an inch above or below the shoulder instead.
Long hair with face-framing layers
Ask for: long layers around your face only, starting at the chin or cheekbone, with the rest of the length and the ends kept blunt.
Why it looks fuller: the front gets shape and movement, while the back keeps its weight. It’s one of the best hairstyles for long thin hair, but long, thin hair often looks see-through at the bottom, so regular trims matter here.
Works best on: anyone who wants to keep length.
Skip it if: your ends are very sparse. A few inches off will usually look thicker than keeping the length.
Soft shag
Ask for: a soft or modern shag, with choppy layers at the crown and around the face and a fairly solid perimeter. Say you want the ends kept full.
Why it looks fuller: short layers on top stand up and move, so the crown looks rounder. Natural wave or curl makes a shag look even thicker.
Works best on: wavy and curly hair, chin to shoulder length.
Skip it if: your hair is very fine and poker-straight. Heavy shag layers can look stringy at the ends.
Curtain bangs
Ask for: soft, longer bangs that part in the middle and sweep to both sides, blended into the face-framing pieces.
Why it looks fuller: bangs cover the front hairline and temples, where thin hair often shows most. They also add volume near your face.
Works best on: any length, and on foreheads with no strong cowlick.
Skip it if: your hair is very sparse at the front. Bangs borrow hair from the top section, so ask your stylist if you have enough.
Textured pixie
Ask for: a pixie with short, textured layers on top and a little extra length at the crown for height.
Why it looks fuller: very short hair has almost no weight, so it stands up on its own. Texture on top hides the scalp better than a flat, sleek pixie.
Works best on: very thin or very fine hair, and anyone who wants the least styling time.
Skip it if: you don’t want to book trims every few weeks to keep the shape.
For ways to style a bob or pixie day to day, our guide to easy hairstyles for short hair goes length by length.
What to tell your stylist
A cut that removes too much bulk can leave thin hair looking thinner, not fuller, so ask your stylist to protect it. Bring a photo, and use clear words like these:
- “Keep the perimeter blunt.” The perimeter is the outline of the cut. The bottom edge should be one solid line.
- “No thinning shears, and please don’t take out weight.” Thinning shears have notched blades made to remove bulk. Point-cutting, tiny snips into the very tips for softness, is fine.
- “Layers only where I need shape,” such as around the face or at the crown.
- “My hair is thin, so show me how to style it.” Ask where to put volume product and how to blow-dry the crown.
Color can help too. Hair that is all one flat shade looks thinner than hair with dimension. A colorist can add a few highlights or lowlights, or soften the contrast between your hair and scalp near the part. If your hair is thinning, leave color to a professional and tell them about it. One of the AAD’s tips for managing hair loss is: “Stop at-home coloring, perming, chemical straightening, and relaxing.”
Easy hairstyles for thin hair you can do at home
These easy hairstyles for thin hair use the hair you have in a smarter way. Each one adds lift, width or texture. Most take about 5 to 10 minutes once you’ve practiced; the root-lift blowout takes closer to 20 to 30, because the rollers need time to cool (times are approximate). Only the blowout uses heat; the other five are heat-free.
If your hair is wavy or curly: part and lift with your fingers instead of a comb or brush, so you don’t pull your curl pattern straight. For root lift, diffuse on low heat with your head tipped forward, and while the crown dries, lift a few small sections at the roots and hold them up with small clips.
At night, a loose pineapple on top of your head keeps curls from being crushed flat. To keep frizz down, put your styling product on while your curls are wet or damp, and don’t brush them once they’re dry.
If your hair is coily and your edges are thin: choose low-manipulation styles, like loose twists or a twist-out, and keep anything at the hairline loose. Skip edge-slicking that pulls, and don’t brush your edges hard. Put light moisture on the lengths rather than heavy product at the roots, and cover your hair with a satin scarf or bonnet at night. If your edges keep getting thinner, see a board-certified dermatologist.
Zigzag part
- Comb your hair straight back, damp or dry.
- Put the tail of a tail comb at your hairline where you usually part.
- Draw the tail back toward the crown in short zigzags, about half an inch to each side, lifting the hair to the left and right as you go.
- Stop at the crown, let the hair fall, and don’t smooth the part flat. Rough up the roots with your fingertips.
Why it looks fuller: a straight part shows a clean line of scalp. A zigzag breaks that line up, and the roots stand up where they cross.
Works best on: any length. On curly hair, draw the zigzag with a fingertip instead of a comb.
If it falls flat: add a little texture spray at the roots before you draw the part, so the hair holds its new position.
Root-lift blowout
- Detangle wet hair gently. The AAD’s hair care tips put it plainly: “Hair is delicate when it’s wet, so use a wide-tooth comb instead of a brush to detangle wet hair.”
- Apply a volumizing mousse or root spray at the roots only, and smooth a heat protectant through the lengths.
- Rough-dry with your fingers on medium heat, lifting the roots up and away from your scalp, until your hair is about 80% dry.
- Take sections about 2 inches wide at the crown. With a round brush, lift each one straight up and point the dryer nozzle down the section, from root to ends.
- While each section is still warm, roll it on a Velcro roller at the root. Leave the rollers in until they’re completely cool, usually 10 to 15 minutes, then take them out. If you take them out while they’re warm, the lift won’t hold.
Why it looks fuller: hair sets its shape as it cools, so roots that cool standing up stay up.
Works best on: straight and wavy hair, chin length and longer. For curls, use the diffuser method above instead.
If it falls flat: use a smaller round brush, and finish each section with the cool-shot button before you roll it.
Pancaked braid
- Brush your hair to one side or straight back.
- Make a loose three-strand braid and tie the end with a small elastic.
- Hold the end of the braid. Starting at the bottom, gently pull the outer edge of each loop outward, a little at a time.
- Work your way up to the top of the braid, keeping both sides even.
Why it looks fuller: widening each loop spreads the same hair over more space, so the braid can look noticeably wider.
Works best on: shoulder length and longer, with second-day hair or a little texture spray.
If it falls apart: pull smaller pieces, and pinch the braid above each loop while you pull.
Propped ponytail
- Brush your hair back loosely, leaving a little softness at the crown.
- Tie a ponytail at the crown or mid-height with a covered elastic, snug, not tight.
- Slide a bobby pin, prongs first and pointing up toward your crown, into the underside of the elastic. Push it up and flat against your head. Add a second pin next to it.
- Wrap a thin strand from the ponytail around the elastic and pin the end underneath.
Why it looks fuller: the pins prop the ponytail up and away from your head, so it sits higher and looks thicker instead of hanging flat.
Works best on: shoulder length and longer.
If it droops: check the pins are pushed fully into the elastic, and use a smaller elastic with more wraps.
Overnight braid waves
- Start with slightly damp hair: mostly dry, not wet.
- Smooth a little mousse or light leave-in through the lengths.
- Make one or two loose braids and tie them with soft elastics. Don’t braid tightly.
- In the morning, check your hair is fully dry, take the braids out, and break up the waves with your fingers, not a brush.
Why it looks fuller: bends and waves make each strand take up more room than straight hair, with no hot tools.
Works best on: shoulder length and longer.
If it falls flat: use more, smaller braids for tighter waves. Hair that’s still damp when you unbraid will drop.
Donut bun
- Tie a ponytail where you want the bun.
- Pull the ponytail through a hair donut that matches your hair color.
- Spread the hair evenly over the donut until it’s covered, then stretch a thin elastic over it to hold the hair in place.
- Wrap the leftover ends around the base of the bun and pin them.
Why it looks fuller: the donut adds the bulk, so a small amount of hair makes a round, full bun.
Works best on: shoulder length and longer.
If the donut shows: use a smaller donut, or gently rough up the ponytail before you spread it so it covers more.
Hairstyles for thinning hair on top
When thin hair shows most at the part or crown, focus on the top of your head. These hairstyles for thinning hair all work by lifting or covering that area:
- Move your part. If you’ve parted in the same place for years, flip it to the other side or move it an inch over. Hair trained to lie one way tends to lift when you push it the other way.
- Use the zigzag part from above to break up a visible line.
- Blow-dry the crown upward with the root-lift blowout, even if you let the rest air-dry.
- Try curtain bangs if the front hairline or temples are the problem.
- Wear a soft half-up. Twist two small sections back from the temples and hold them over the crown with a small clip. On thin hair, size down; our guide to claw clip hairstyles step by step explains why.
- Add grip at the roots. A little dry shampoo or texture powder helps roots stand up, and it works as a midday refresh when your roots go flat. Dry shampoo absorbs oil; it doesn’t clean your hair. For days when your roots are oily too, see our hairstyles for greasy hair.
- For an event or photos, a root touch-up spray or hair-fiber powder in your shade can tint the scalp along the part so it shows less. Both are cosmetic and wash out with shampoo.
- Try a wide, soft headband set just behind the hairline, which covers the front of the part.
Skip slicked-back styles and tight, sleek center parts, which put the scalp on show. They also pull. The AAD’s hair loss tips include: “Stop wearing your hair tightly pulled back in a bun, ponytail, pigtails, cornrows, or braids.”
Thin hair hairstyles by length
| Length | Best cut | Best at-home style | Avoid |
|---|---|---|---|
| Short (pixie to chin) | Textured pixie or blunt bob | Zigzag part and root lift | Flat, sleek styling |
| Shoulder length | Collarbone lob or soft shag | Root-lift blowout or propped ponytail | Heavy layering at the ends |
| Long | Face-framing layers, blunt ends | Pancaked braid, braid waves or donut bun | Letting ends get see-through between trims |
If you’re torn between lengths, shorter usually wins with thin hair. Less weight means more lift at the roots and a denser-looking edge.
Mistakes that make thin hair look thinner
- Conditioner or oil at the roots. Put conditioner on the mid-lengths and ends, and keep heavy oils and creams off the scalp.
- Too many layers. Every layer removes hair from the ends.
- Heavy teasing. A few light passes at the crown are enough. The AAD’s advice for people managing hair loss, “Brush or comb your hair gently, and only enough to style it,” is good practice for thin hair in general.
- Rubbing with a towel. Rough drying roughs up the hair. The AAD suggests you “Wrap your hair in a towel to absorb the water.”
- Tight styles every day. Snug, not tight, and change your style often.
- Too much product. Thin hair drops under weight. Start with a small amount and add more only if you need it.
Does cutting thin hair make it grow thicker?
No. Cutting your hair doesn’t change the follicles it grows from, so a haircut won’t make it grow in thicker. Cleveland Clinic makes the same point about the shaving myth: a dermatology resident there explains that shaving doesn’t make hair grow back thicker or faster.
A regular trim still helps, for a different reason. It removes split, see-through ends, so the bottom of your hair looks denser. That’s a visual effect, not new growth.
When thin hair is more than a styling problem
Some shedding is normal. The AAD says: “It’s normal to shed between 50 and 100 hairs a day.” A change you can see is different. On its page about female pattern hair loss, the AAD notes that a woman’s part often gets wider with this type of loss. It also says: “FPHL is actually the most-common cause of hair loss in women.” It adds: “Treatment delivers the best results when started at the first sign of hair loss.”
See a board-certified dermatologist if your hair is thinning quickly, falls out in patches or clumps, or your scalp is itchy, sore or scaly. As the AAD puts it on its page about hair loss vs. hair shedding: “If you are concerned by the amount of hair falling out, you don’t need to suffer in silence. You can turn to a dermatologist for help.”
The hairstyles in this guide can make thin hair look fuller, but they can’t change how much hair grows.
Frequently Asked Questions
What are the best hairstyles for thin hair?
For cuts, a blunt bob, a collarbone lob with invisible layers, or long hair with face-framing layers and blunt ends usually look fullest. For styling, a zigzag part, a root-lift blowout and a pancaked braid add the most visible volume. The best choice depends on your length and on where your hair looks thinnest.
What hairstyle makes thin hair look thicker?
Styles that combine blunt ends with lift at the roots. A blunt bob looks dense at the edge, and a root-lift blowout makes the crown look fuller. Texture helps too: waves from overnight braids make each strand take up more room. A pancaked braid can look noticeably wider than a regular one, since pulling the loops apart spreads the same hair over more space.
Is it better to have long or short hair with thin hair?
Shorter usually looks fuller, because there’s less weight pulling the roots flat and the ends stay dense. Shoulder length and above is a common sweet spot. Long hair can work too if you keep the ends blunt and trim them regularly, so the bottom doesn’t turn see-through.
Should thin hair be layered?
Lightly, and only where you need shape. Heavy layering takes hair away from the ends, which makes thin hair look thinner. Ask for face-framing layers, invisible layers under the top section, or a few layers at the crown, and keep the perimeter blunt. Ask your stylist not to use thinning shears.
How can I hide thinning hair on top?
Move your part to the other side, or use a zigzag part to break up the line. Blow-dry the crown upward, add a little texture powder at the roots, and try curtain bangs or a soft half-up over the crown. Skip slicked-back styles. If the thinning is new or getting worse, see a board-certified dermatologist.
Do bangs make thin hair look thicker?
They can. Bangs cover the front hairline and temples, where thin hair often shows most, and they add volume near your face. Soft curtain bangs are the easiest to wear. Bangs do borrow hair from the top section, though, so ask your stylist if you have enough hair at the front first.
Are hair extensions OK for thin hair?
Be careful with them. The AAD’s page on hairstyles that pull lists “Hair extensions or weaves, especially on relaxed hair” among styles that can cause traction alopecia, a type of hair loss from pulling, when they’re too tight. Take clip-ins out at night, and stop if anything pulls or hurts.
The short version
The best hairstyles for thin hair keep the ends blunt and put lift at the roots. For a cut, ask for a blunt bob, a collarbone lob, a soft shag, a textured pixie, or long hair with face-framing layers only, and tell your stylist not to take out weight. At home, a zigzag part, a root-lift blowout, a pancaked braid, a propped ponytail, overnight braid waves or a donut bun will make the same hair look fuller.
Keep heavy product off your roots, go easy on teasing, and wear styles snug, not tight. If your hair is getting thinner rather than just being thin, see a board-certified dermatologist.



One Comment